Sage 50 vendor dat file error is a database problem that happens in the firm. These problems might occur as a result of a damaged file, an inaccurate setting in the file, or a problem with the desktop hard disk. When the firm data folder is not there or is not in the correct data path. In this article, you will get to know the causes and solutions to the error.
The Following are the Causes of Sage 50 Vendor dat file error:
- The company data folder is not in the data path.
- A corrupted file
- Permissions on a shared folder are incorrect.
- A bad sector on your hard disk
- Incorrect file configuration
The Following are the Solutions to the Sage 50 Vendor dat file error:
The solution to the sage 50 vendors dat file problem is provided below; please follow the instructions carefully to resolve the fault.
If the issue occurs on only one workstation, consider restarting it first.
Step 1: Examine the file permissions.
Check my data file permission settings.
Step 2: Examine the hard drive for errors.
Note: Check your hard drive for errors before beginning the disk check.
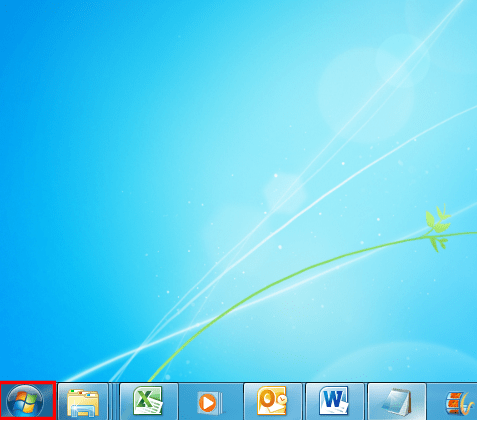
- Right-click the Start Windows icon and choose Properties.
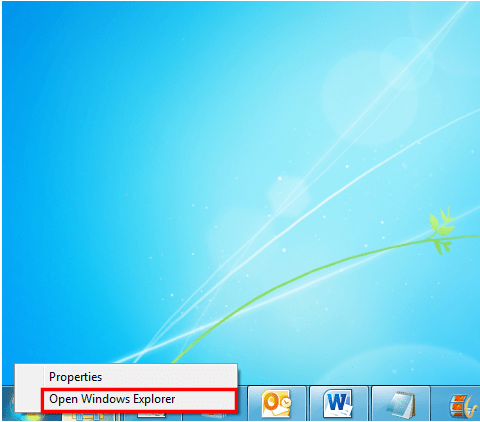
- Click Open Windows Explorer from the shortcut menu.
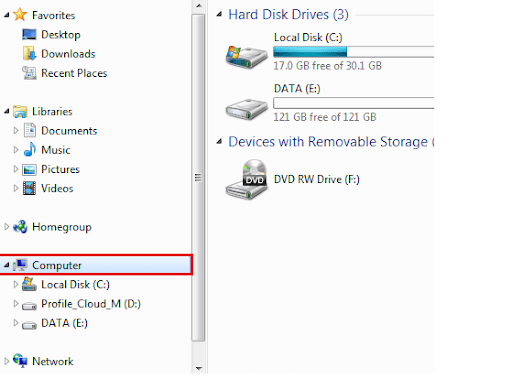
- To view your drives in the right pane, click Computer in the navigation pane.
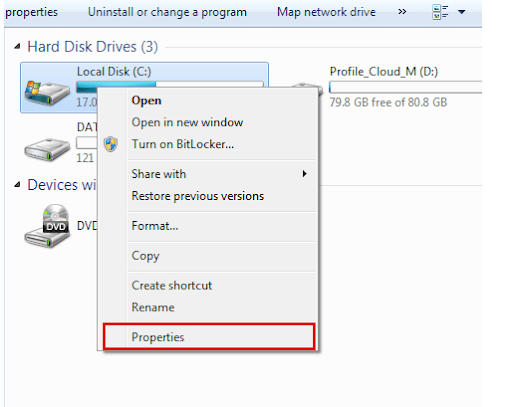
- Right-click the drive you wish to examine and choose Properties.
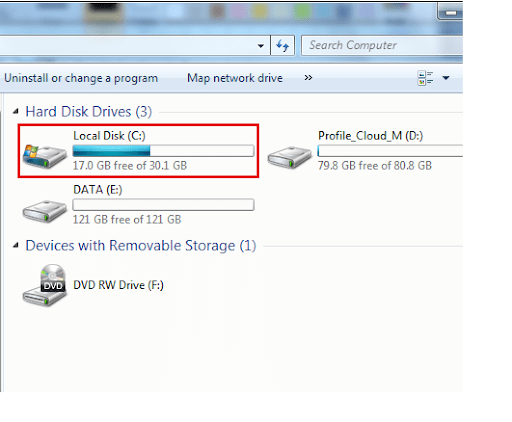
- Select Properties.
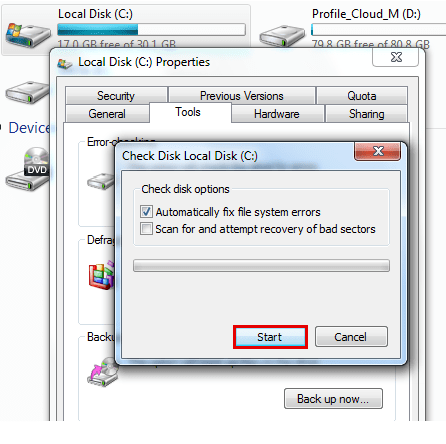
- Navigate to the Tools menu.
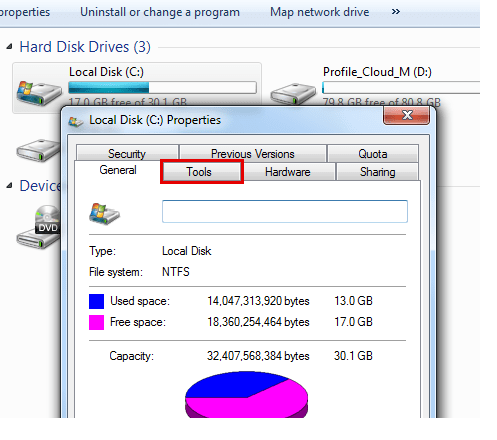
- Choose the Check Now option.
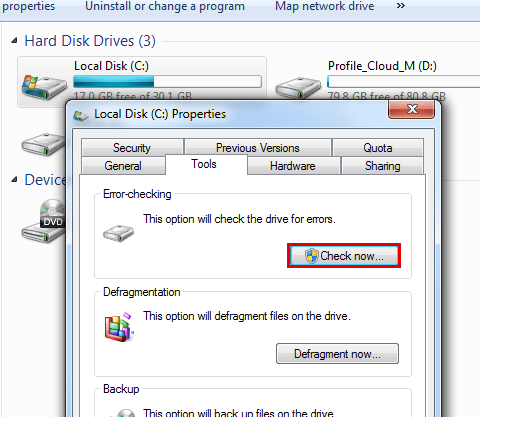
- Select the Automatically resolve file system problems check box in the Check Disk disk name> window.
Note: If you want to run a thorough test just on the hard drive, select the Scan for and try recovery of the damaged sectors box. In any instance, you should do so if you have a reasonable belief in an existing hardware error. Keep in mind, however, that the operation might take a long time. We recommend that you do not select this option as your first routine check.
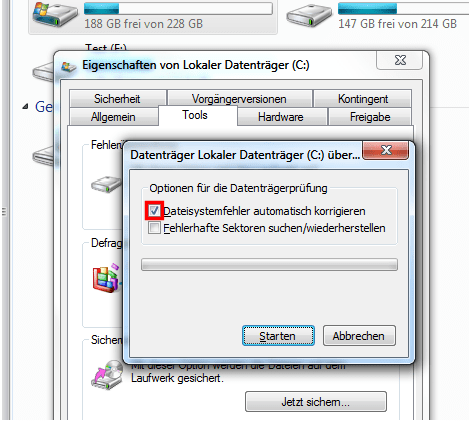
- Press the Start button.
- If the drive you want to view is now in use and it is your system drive, a warning message will appear in a dialog box. In this case, click Schedule disk check.
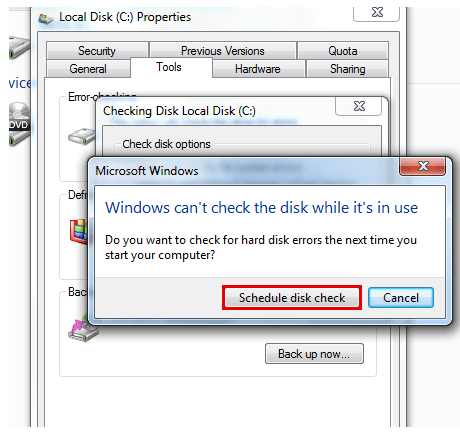
- Before restarting your computer, close any active applications. When the checking is complete, it will begin automatically before the next Windows startup and display the results.
- You do not need to switch off the computer if you are not verifying the system disk. However, the selected drive may also be in use. You will receive a notice in this circumstance. Click Force a dismount once you’ve saved all of your data and closed all of your open apps.
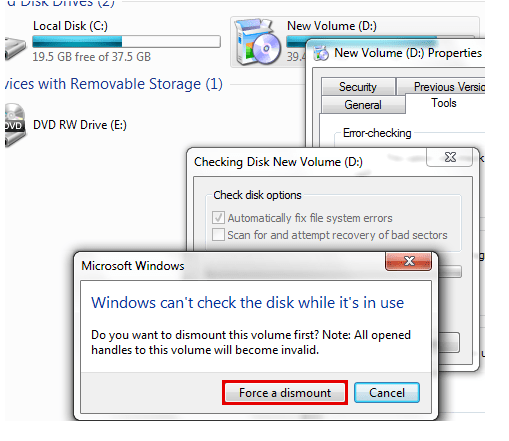
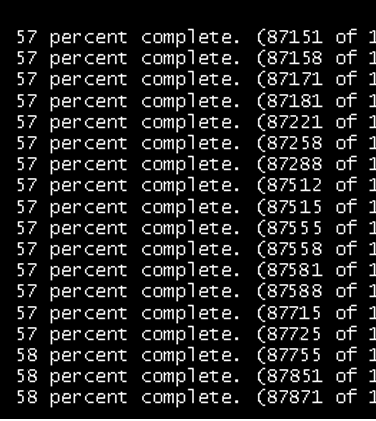
- The checking procedure starts right away. The results will be presented after it has been finished.
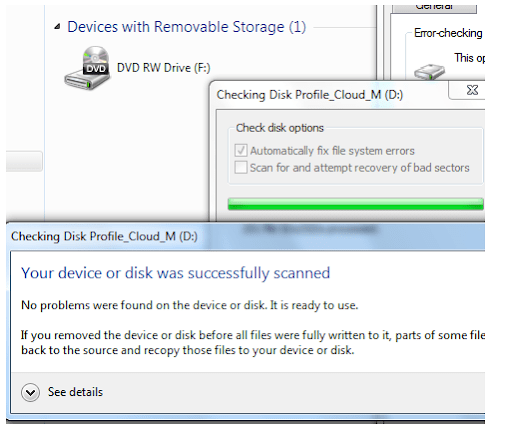
Note: Please keep in mind that if you receive any warnings indicating that problems have been discovered, you must rectify them.
STEP 3: Any type of I/O mistake in a file that may be safely removed without affecting your data
- What kind of files can be reindexed? for details on which files may be securely removed without affecting the rest of your database
- If you receive any form of I/O error in one of these files and are ready to cope with the loss of data, navigate to your company’s data location and delete the file
STEP 4: There was an I/O error in the file [VENDOR].DAT, which can be reindexed.
- What kind of files can be reindexed?
- Integrity Checklist
- Select Help
- Tap on Customer Helpdesk, and Service
- Select Integrity Check
- Give a name to your backup
- Decide where you want to save
- Then click Save
- Select Reindex Files in the Integrity
- Then Check the window.
- Select the file referenced in the error from the Reindex File List
- Then click OK.
- See the file location for errors
- Right-click the file
- There are three ways to reindex the file. Uncheck the Read-only check box before attempting to reindex.
- If the file was not read-only, or if it was and the second effort to reindex it failed, you must restore a backup created before the mistake occurred.
STEP 5: I/O error in file [VENDOR].DAT, which cannot be reindexed on a regular basis
Note: What kind of files can be reindexed? for details on which files can be reindexed
- If you encounter an I/O error in a file that is not in the reindex file list, you can try to run the Repair Company tool.
- If you see an error notice stating that the file could not be reindexed, navigate to the file location
- Right-click the file
- Then choose Properties
- If the Read-only check box is selected, uncheck it
- Restart Repair Company.
- If the file was not read-only, or if it was and the second attempt failed, you must restore a backup created before the mistake occurred.
STEP 6: The Company data folder is not in the data path.
- An I/O error might occur if your firm data folder is not found in the data path, particularly on a detachable USB device.
- Navigate to the folder containing the mentioned file
- Copy the full data folder.
- Navigate to your data path
- Copy the folder and paste it into the data path.
- Confirm that you are able to open your business.
STEP 7: Writing to or reading from UserPref.dat
- Close the application by right-clicking the Sage 50—U.S. Edition icon.
- Click Execute as administrator
- Check to see whether you can now finish the procedure.
Conclusion
You’ll discover a solution to the Sage 50 vendor dat file problem, as well as information on the error’s causes and symptoms, in the previous section. You must solve it using the prior answers on your own. Contact the Sage 50 help center if you continue to face problems, queries, or challenges when applying solutions. Employees are competent and well-trained to assist you. To fix any issues, you can contact the staff 365 days a year.
FAQ’s
HOW TO RUN THE REPAIR COMPANY UTILITY IN SAGE 50 VENDOR DAT FILE ERROR?
After you’ve adjusted your application shortcut to launch the Integrity Check utility, the Repair Company tool will show in your File menu.
- Close Sage 50 if it is open.
- Select Properties from the context menu when you right-click on the Sage 50 icon.
- Place your mouse to the far right of the Target area, enter a blank space, type “-i” without the quotations, and then click Apply and OK.
- Launch Sage 50 with the newly changed icon.
- Navigate to File, Repair Company.
WHEN SHOULD A REPAIR COMPANY BE CALLED IN THE EVENT OF A SAGE 50 VENDOR DAT FILE ERROR?
- The Repair Company software is often used to try a repair on a file that cannot be reindexed routinely using the Reindex File integrity check. What files can be reindexed, according to Article 15785? for further information on those files.
- Repair Company is also used to try a repair on a database that has been severely damaged and has no valid backups. Having to restore a significantly damaged database using a Repair Company is preferable to restoring a valid backup.