
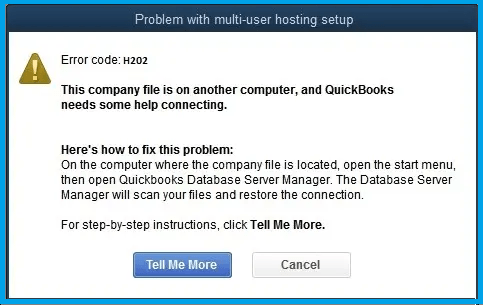
We can help you fix QuickBooks Error H202 when switching to multi-user. QuickBooks Error Code H202 pops up when users try to access QuickBooks in multi-user mode and the server connection is jammed. It may also occur because the company file is on another device and QuickBooks needs some help to connect it. When a user encounters this mistake, a QuickBooks user can not access a company file that is installed on another device.
To explore more or looking for resolutions to get rid of the Error code H202 then you land on the right page. Here, you can find the best resolution including possible reasons and symptoms of the error. So, go through the complete blog till the end to get more information.
What are the Possible Causes Behind QuickBooks Error Code H202?
There are various reasons which QuickBooks is not able to connect the company files. Here are some of the reasons that are discussed below:
- Database Server Manager gets damaged or corrupt
- The firewall feature on your device blocks the direction of communication.
- Conflict occurs between QuickBooks and DNS server.
- It cannot link to the server because it is unable to get IP address of the host system or server hosting the company file
- Hosting configuration is incorrect
- Not running the QBCF Console or QuickBooks DBXX.
- Company files/file corrupted.
What are the Indications of QuickBooks Error H202?
The error can have the following symptoms:
- QuickBooks can freeze or hold up.
- Your machine could get inactive.
- QB users can not switch to Multi-User mode.
- H202 error Quickbooks shows a message on the computer.
- You can’t access a client file that is stored on another computer.
Efficacious Methods to fix QuickBooks H202 Error.
NOTE: Back up your QBW file before performing the mentioned method to fix this error. If you have not back up your QBW file and then go back and create back up.
There are numerous methods to eliminate this error. For best results or looking for instant solutions, follow these methods but it is suggested you follow these steps in the given sequences:
Method 1: Examine the Network connectivity
- Initially, run QuickBooks on all the systems networked which are used for QuickBooks
- Next, go to the File menu and then choose Utilities
- After that, turn off the hosting
- Now, click on the Windows start button and then type “This PC” on the QuickBooks Host Computer
- Double-click on the network option from the let windowpane to verify that whether the all the networked is visible or not
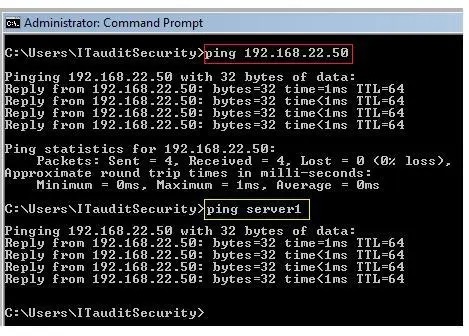
- Next, ping all the workstations accordingly from the QuickBooks Host/Server computer
- Also, ping the particular QuickBooks Host/Server computer that shows h202 Quickbooks error.
- Now, you can ping test for command on the Command Prompt
- Type ping command syntax: ping [computer Name] and then press Enter.
Method 2: Use QuickBooks File Doctor to Fix this error
Download and install the latest version of QuickBooks File Doctor. Ignore if already installed. It opens automatically after the installation. If not then go to start menu, open tool and click on the icon of file doctor. It might help to resolve the Network issues.
If not then follow the other methods.
Method 3: Access the Network Diagnostic Tool
- The very first, download as well as install the Tool
- Check out the folder where you store the data
- Now note down the IP addresses numbers as well as the Network Interfaces
- You can see the firewall status section open ports button just click on it to allow those ports for QuickBooks
- Now check out the connectivity for data file
- Finally, try to open the company data file
If the error still exists then try to add QuickBooks firewall port exceptions in Windows Firewall and the security software in order to get rid of the error h202 QuickBooks.
Also Read: QuickBooks Install Diagnostic Tool
QuickBooks Firewall ports information
- QuickBooks 2016 firewall ports: 8019, 55368-55372, 56726
- QuickBooks firewall Ports: 8019, 55373-55377, 56727
- QuickBooks 2018 Firewall Ports: 56728, 55378-55382
- QuickBooks 2019 does not have any static Firewall Ports: When you search the company file in Database Server Manager, the ports immediately refresh. Seek the next approach in case you still experience H202 errors in QuickBooks.
If not then follow the other methods.
Method 4: Add the QuickBooks Server Information into Windows Host File
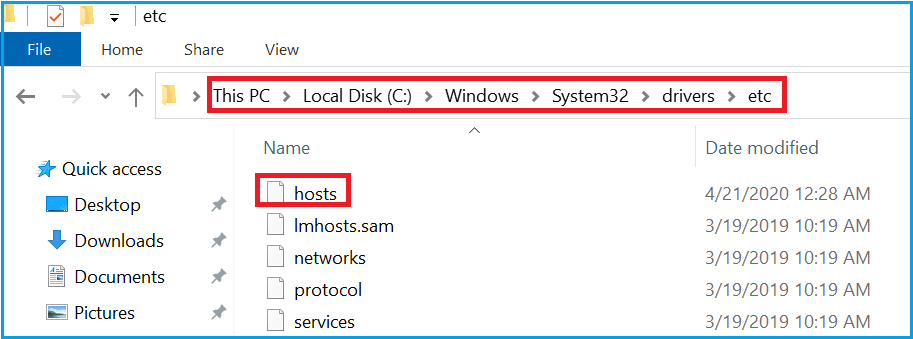
- Search the windows host file in the location: c:\windows\system32\drivers\etc
- Ensure that you can only apply to the computers in which you get QuickBooks Error code H202
- Browse the above location for Windows host file
- C:\Windows\System32\Drivers\Etc.
- C:\Windows\Syswow64\Drivers\Etc.
- Right-click on that and click open with option and choose notepad
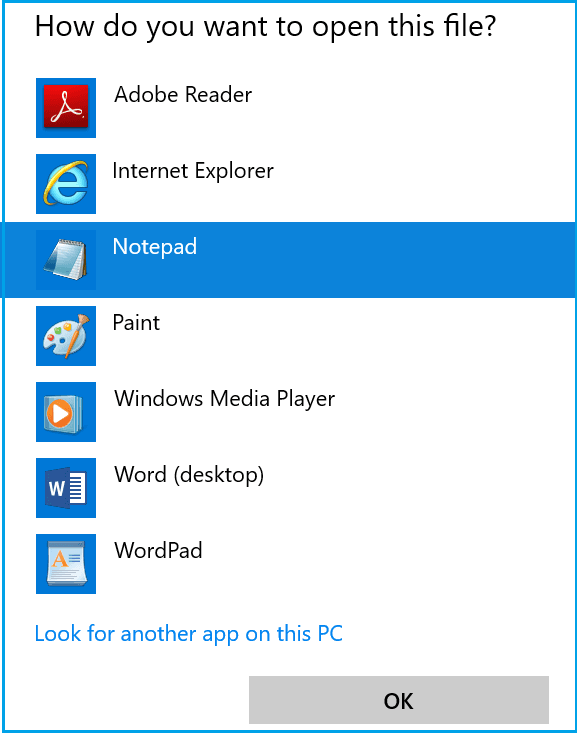
- Using drop-down select the host file and then type the server IP Address
- Now, press TAB key and type QuickBooks Server Name
NOTE: Use the TAB key instead of space bar for separating the IP address and server name
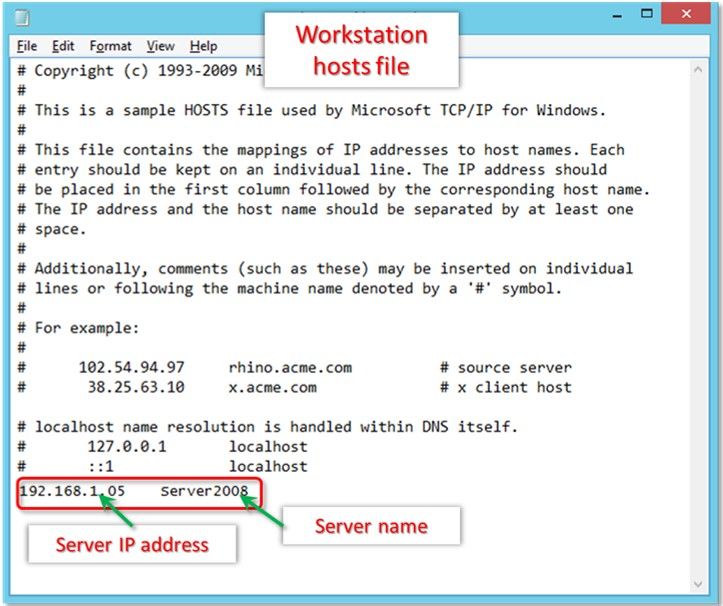
- Press together Ctrl + S to save all changes that are made in the host file and then close the Notepad.
Method 5: Change the location of Company file
- The very first create a new folder in order to keep the company file and prefer the Drive C: to save the folder
- Now, choose the company file and the respective .TLG file from the existing file or folder
- Press Ctrl + C to copy it and paste it to the new company file folder by pressing Ctrl + V
- Next, try to open the file in multi-user mode
Method 6: Delete the .ND file and recreate it
- The very first, type .ND in the Windows search bar and Enter
- Right-click on the same in the open window and click on the Delete option
- Confirm delete if it asked
- Press the Windows start button
- Select All Programs and then go to QuickBooks software
- After that, select or click on the option named “QuickBooks Database Server Manager”
- Now hit the “Scan Folder” option
- Next, click on “Add Folder” button and then look for the company file folder
- Select the company file and then hit Ok button
- Hit the scan option in order to start the scanning process
- Once the scan process completes then hit the “Close” option.
You May Also Read: QuickBooks Payroll Update Errors
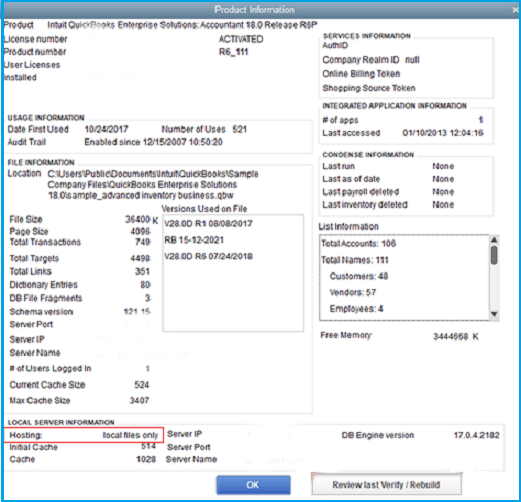
Method 7 – Set Hosting to Local Files
Follow these steps to make sure your file isn’t being shared with other company systems.
- Open QuickBooks and press F2 to open the product information screen.
- On the left hand side, select the Hosting tab to reflect ‘local files only’ under Local Server Information.
Method 7: Configure QuickBooks Database Server Manager
- First of all, press together Windows + R from the keyboard and then type MSC in the search bar
- Next, choose the Services option
- After that select the QuickBooksDBxx (xx represents QuickBooks Version) using the drop-down arrow
- Double-click on it and then click on a stop in order to disable the services
- Choose the service start option as Automate which is followed by Start
- Finally, try to open QuickBooks and open the company file once again.
In conclusion
If you are unable to resolve QuickBooks Error code H202 even after going through all of the above solutions, that means your company file is badly damaged and needs instant repair. So, without wasting a lot of time, download Repair for QuickBooks Software and access it to eliminate all the company file errors. If the error still exists then get in touch with QuickBooks Experts.
FAQ’s
Errors H202 in QuickBooks can be caused by many things, including the company’s strategy.
- QuickBooks is not working properly.
- When QuickBooks see the error code H202.
- The QuickBooks software is causing the company to experience downtime.
- The firewall prevents us from communicating.
- If the service components are damaged.
To fix QuickBooks error code H202, you’ll need to turn off the Host multi-user access option.
Yes, if you want to stop multi-user access on the host, then disable it so that it doesn’t register changes as if people are still accessing the server.